Printable Rice Bag Instructions
Printable Rice Bag Instructions - Instruction tags for the rice or corn filled heating pad | etsy. Fold the material in half with right sides together. Fill your diy rice heating pad with the rice and. Place the rice bag into the flannel cover and you have made a rice heating pack! I then made my own label and. Start at one of the short sides and sew the long side and part of the opposite short side, leaving a gap of several. For those of you that make the rice or corn filled bags to heat up in the microwave, here are the perfect tags to attach. Beginning at fold, stitch one long edge, turn the corner and stitch across the end, using 5/8 inch seam allowance. Lay the rice bag on top of the paper towel. Rice bag october 29, 2013 stitch up this easy rice bag and pop it in the microwave whenever you need a little warmth. It’s also pretty neat when the nurse says “ use heat”. For those of you that make the rice or corn filled bags to heat up in the microwave, here are the perfect tags to attach. Place the rice bag into the flannel cover and you have made a rice heating pack! Use a sewing machine and sew a basic.. Place the rice bag into the flannel cover and you have made a rice heating pack! It’s also pretty neat when the nurse says “ use heat”. For those of you that make the rice or corn filled bags to heat up in the microwave, here are the perfect tags to attach. Decide which part of the fabric will be. Grab a small plastic or paper cup and remove the bottom so that this will act as a funnel for your rice in your rice heating pad. Fill your diy rice heating pad with the rice and. Rice bag october 29, 2013 stitch up this easy rice bag and pop it in the microwave whenever you need a little warmth.. These little bags are so easy to make and require very few. Decide which part of the fabric will be the top of the bag, and then fold an edge over (~1/4 inch) to create a hem. Place the rice bag into the flannel cover and you have made a rice heating pack! Beginning at fold, stitch one long edge,. Beginning at fold, stitch one long edge, turn the corner and stitch across the end, using 5/8 inch seam allowance. Grab a small plastic or paper cup and remove the bottom so that this will act as a funnel for your rice in your rice heating pad. If you have a low watt microwave, set the power. Microwave for 2. Fill your diy rice heating pad with the rice and. Grab a small plastic or paper cup and remove the bottom so that this will act as a funnel for your rice in your rice heating pad. Lay the rice bag on top of the paper towel. I then made my own label and. This little bag of rice you’ll. Stitch the opening in muslin bag shut. Lay the rice bag on top of the paper towel. Once snug and you like the placement and where the edges are overlapping, then place pins through the material at the corners, near where the rice pack ends. Made them in assorted colors and patterns and filled them with rice (there are other. Use a sewing machine and sew a basic. If you have a low watt microwave, set the power. This little bag of rice you’ll find is mighty nice when the doctor tells you “ice”. These little bags are so easy to make and require very few. Beginning at fold, stitch one long edge, turn the corner and stitch across the. This little bag of rice you’ll find is mighty nice when the doctor tells you “ice”. Start at one of the short sides and sew the long side and part of the opposite short side, leaving a gap of several. Place the rice bag into the flannel cover and you have made a rice heating pack! Beginning at fold, stitch. Fold the material in half with right sides together. Hot cold rice bag details: Decide which part of the fabric will be the top of the bag, and then fold an edge over (~1/4 inch) to create a hem. Lay the rice bag on top of the paper towel. Fold fabric in half, matching right side to right side. For those of you that make the rice or corn filled bags to heat up in the microwave, here are the perfect tags to attach. This little bag of rice you’ll find is mighty nice when the doctor tells you “ice”. Rice bag october 29, 2013 stitch up this easy rice bag and pop it in the microwave whenever you need a little warmth. Use a sewing machine and sew a basic. Beginning at fold, stitch one long edge, turn the corner and stitch across the end, using 5/8 inch seam allowance. Decide which part of the fabric will be the top of the bag, and then fold an edge over (~1/4 inch) to create a hem. Instruction tags for the rice or corn filled heating pad | etsy. Lay the rice bag on top of the paper towel. Hot cold rice bag details: It’s also pretty neat when the nurse says “ use heat”. Once snug and you like the placement and where the edges are overlapping, then place pins through the material at the corners, near where the rice pack ends. Made them in assorted colors and patterns and filled them with rice (there are other options for fillers, but this was the easiest to acquire and inexpensive). Stitch the opening in muslin bag shut. Fill your diy rice heating pad with the rice and. Grab a small plastic or paper cup and remove the bottom so that this will act as a funnel for your rice in your rice heating pad. These little bags are so easy to make and require very few.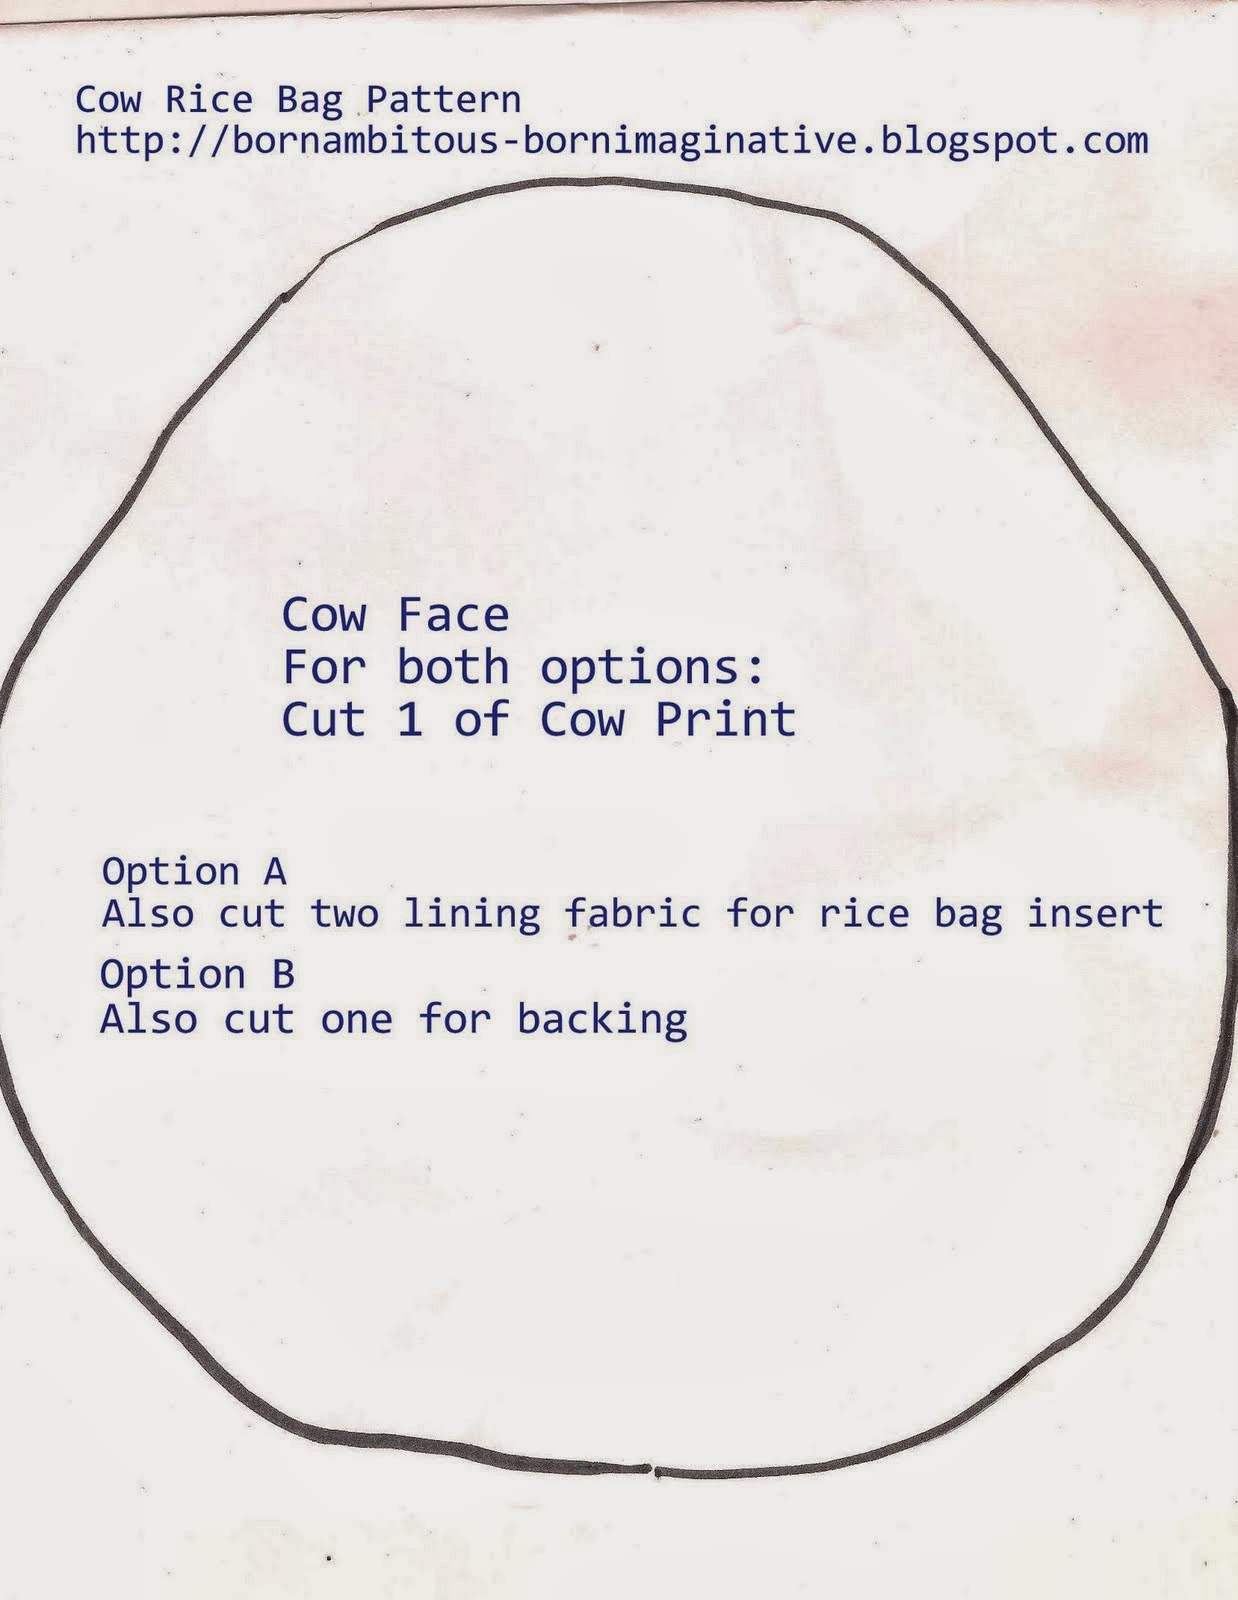
born imaginative. Mama Made Cow Rice Bag (Free Pattern)

Printable Rice Bag Instructions World of Jolie

Printable Rice Bag Instructions World of Jolie

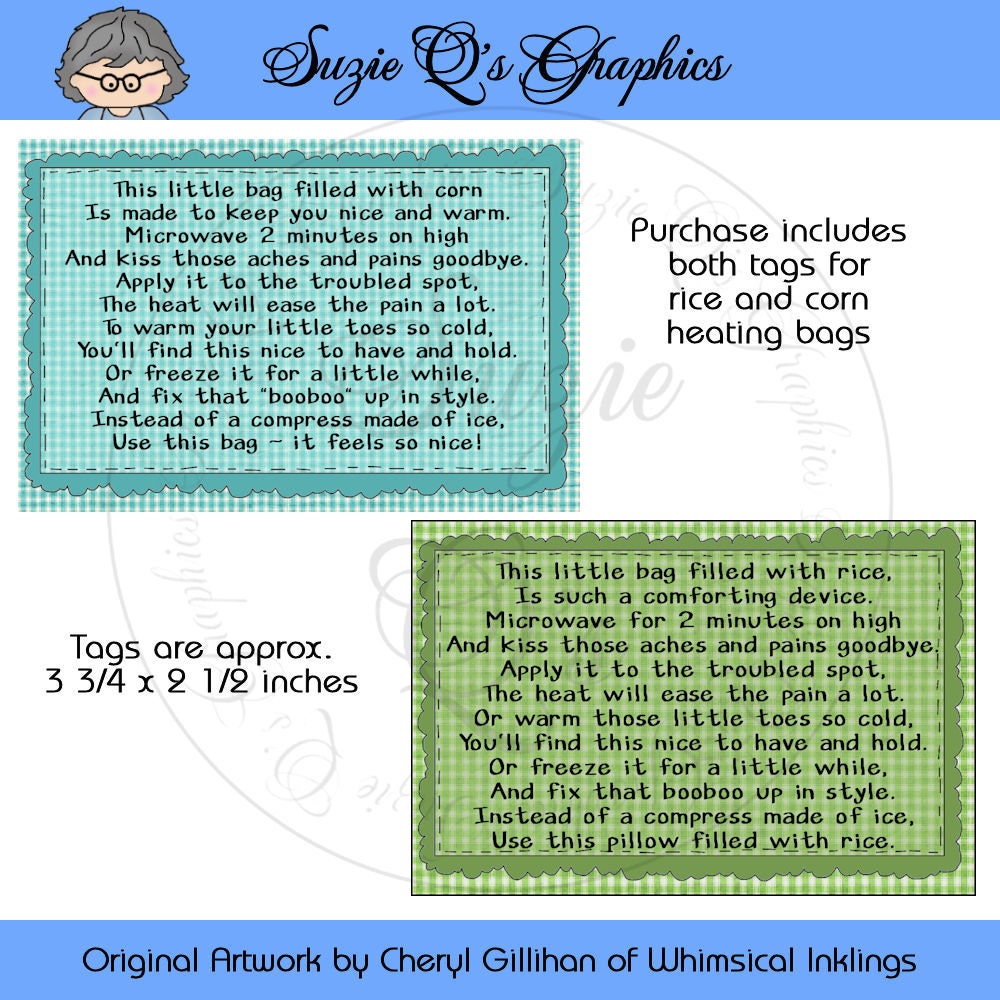
Instruction Tags for the Rice or Corn Filled Heating Pad (bags) CU

born imaginative. Mama Made Cow Rice Bag (Free Pattern)
Printable Rice Bag Heating Instructions TheRescipes.info

cute pattern for a rice bag Sew It Pinterest Rice bags, Patterns

Printable Rice Bag Heating Instructions TheRescipes.info

Pin by Karen Scott on sewing Rice bag warmer, Rice bags, Diy rice bags

DIY Rice Bag Warmers Diy rice bags, Rice bag warmer, Sewing projects
Microwave For 2 Minutes On High To Make Those Aches And.
Start At One Of The Short Sides And Sew The Long Side And Part Of The Opposite Short Side, Leaving A Gap Of Several.
Fold The Material In Half With Right Sides Together.
If You Have A Low Watt Microwave, Set The Power.
Related Post: