Select Printable Area Excel
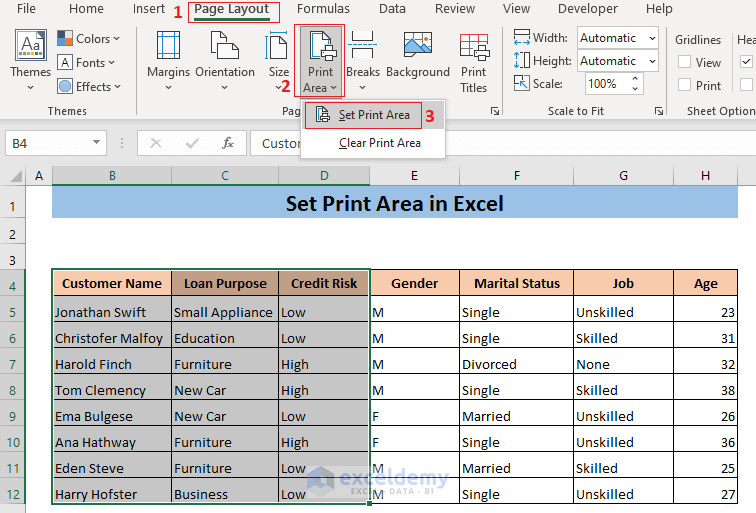
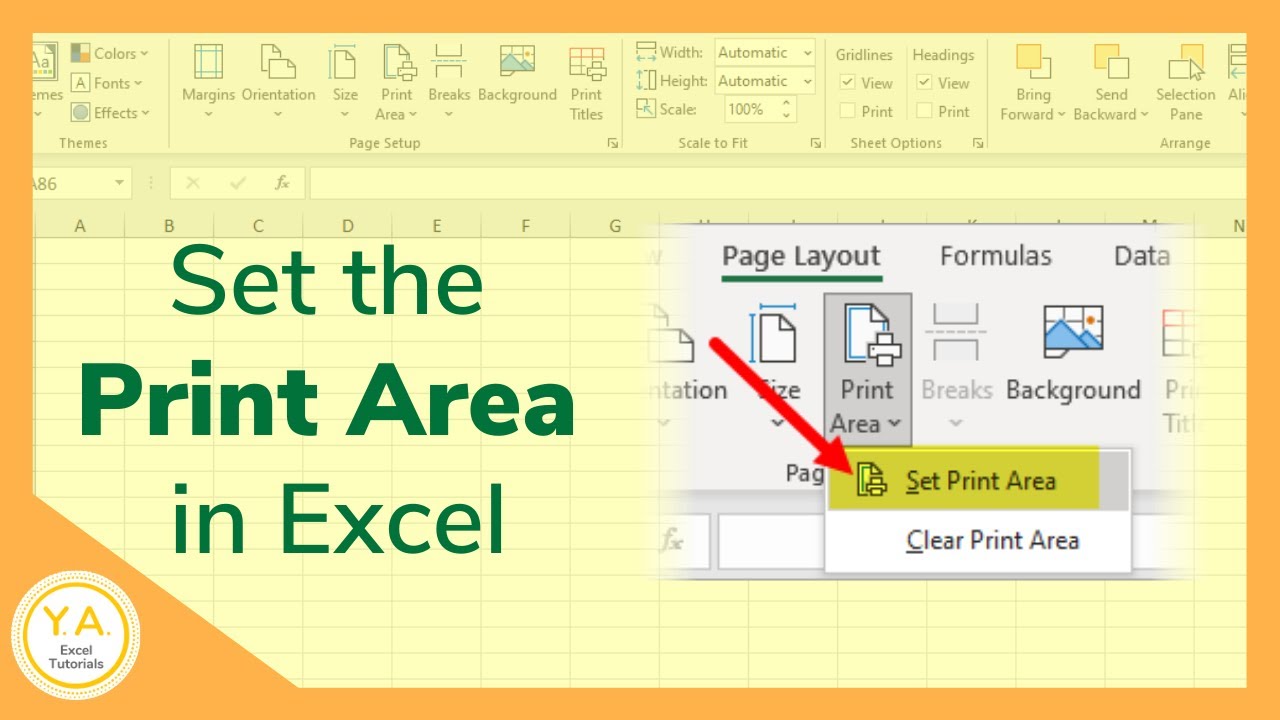
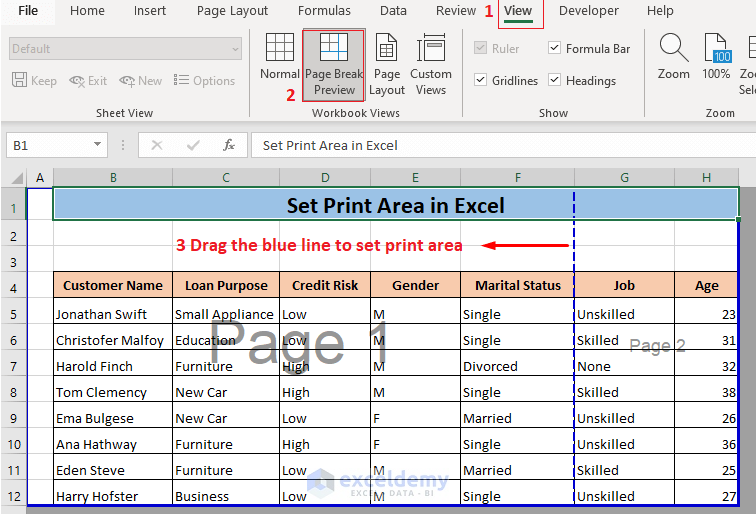
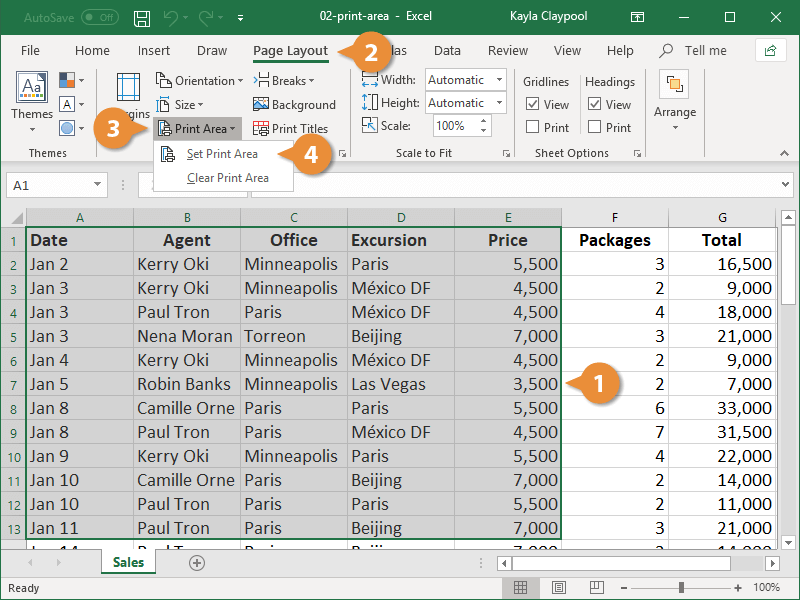
Select Printable Area Excel - Go to the page layout tab, click on print area.; Select a range of cells. Print the selection, define the print area in the page setup dialog, or create the print area. Click the list arrow for the print area settings and then. 목차 엑셀 인쇄영역 설정 기본부터 📑 페이지 나누기 미리보기 사용법 🔍. To do this, you need to. Setting the print area in excel for multiple pages can save time and paper by ensuring only the parts of your spreadsheet you need are printed. Excel provides three easy ways to print chosen ranges: To set the print area, you select the area and hit the set print area command; We can set print area in excel for multiple pages very effectively following the 2 ways described in this article briefly. Navigate to the view tab and click on page break preview.; You can also use page breaks to divide your worksheet into separate pages for printing. To set a single print area in excel, you can use the set print area command, page setup dialog box, page break preview feature, print selection setting, and excel vba code, as described in.. Navigate to the view tab and click on page break preview.; Follow the steps below to set the print area so only the selected cells will print in excel instead of the entire worksheet: Select the area that you need to print. 목차 엑셀 인쇄영역 설정 기본부터 📑 페이지 나누기 미리보기 사용법 🔍. Click the list arrow for the print. To set a print area, execute the following steps. Select the area that you need to print. Follow the steps below to set the print area so only the selected cells will print in excel instead of the entire worksheet: Print the selection, define the print area in the page setup dialog, or create the print area. select the. Open the spreadsheet where you want to adjust the. Next, click file > print or press ctrl+p to view the print settings. Here's how to do it: To set a print area, execute the following steps. 목차 엑셀 인쇄영역 설정 기본부터 📑 페이지 나누기 미리보기 사용법 🔍. 엑셀 인쇄영역 설정은 직장인이 알아야 할 중요한 스킬입니다. Select the area that you need to print. You will know the print area is set when you see the gray lines outlining your selection. To do this, you need to. Print the selection, define the print area in the page setup dialog, or create the print area. 이 글에서 쉽게 해결할 수 있는 방법을 소개합니다. To do this, you need to. Follow the steps below to set the print area so only the selected cells will print in excel instead of the entire worksheet: Excel provides three easy ways to print chosen ranges: Open the spreadsheet where you want to adjust the. Next, click file > print or press ctrl+p to view the print settings. You can also use page breaks to divide your worksheet into separate pages for printing. To do this, you need to. Setting the print area in excel for multiple pages can save time and paper by ensuring only the parts of your spreadsheet you need are printed.. To do this, you need to. We can set print area in excel for multiple pages very effectively following the 2 ways described in this article briefly. Open the spreadsheet where you want to adjust the. Print the selection, define the print area in the page setup dialog, or create the print area. When you try to print, it gets. You will know the print area is set when you see the gray lines outlining your selection. To set a print area, execute the following steps. 이 글에서 쉽게 해결할 수 있는 방법을 소개합니다. To set the print area, you select the area and hit the set print area command; Print the selection, define the print area in the page. On the page layout tab, in the page setup group, click print area. When you try to print, it gets stucked with a 'printing 1 of 1' notification on the screen, excel freezes when print job sent such that you cant close excel unless you end task on task. You will know the print area is set when you see. 목차 엑셀 인쇄영역 설정 기본부터 📑 페이지 나누기 미리보기 사용법 🔍. To set a print area, execute the following steps. Follow the steps below to set the print area so only the selected cells will print in excel instead of the entire worksheet: Here are the steps to set the print area in excel: Excel provides three easy ways to print chosen ranges: You will know the print area is set when you see the gray lines outlining your selection. 엑셀 인쇄영역 설정은 직장인이 알아야 할 중요한 스킬입니다. Select the area that you need to print. You can also use page breaks to divide your worksheet into separate pages for printing. When you try to print, it gets stucked with a 'printing 1 of 1' notification on the screen, excel freezes when print job sent such that you cant close excel unless you end task on task. select the cells you want to print. Click the list arrow for the print area settings and then. Print the selection, define the print area in the page setup dialog, or create the print area. 이 글에서 쉽게 해결할 수 있는 방법을 소개합니다. Open the spreadsheet where you want to adjust the. Here's how to do it: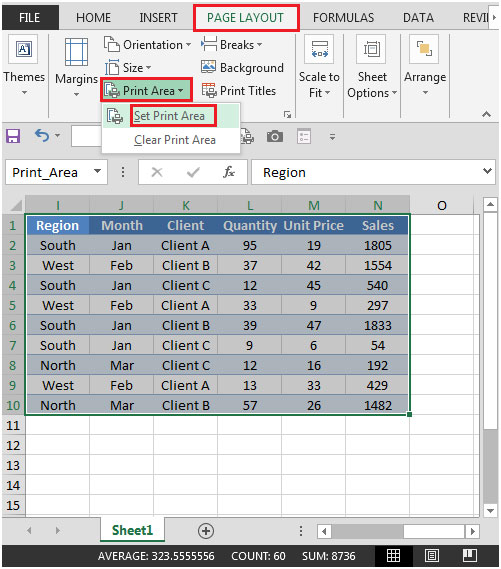
How To Select Printable Area In Excel

How To Select Printable Area In Excel
How To Select Printable Area In Excel
Select Printable Area Excel

Select Printable Area Excel
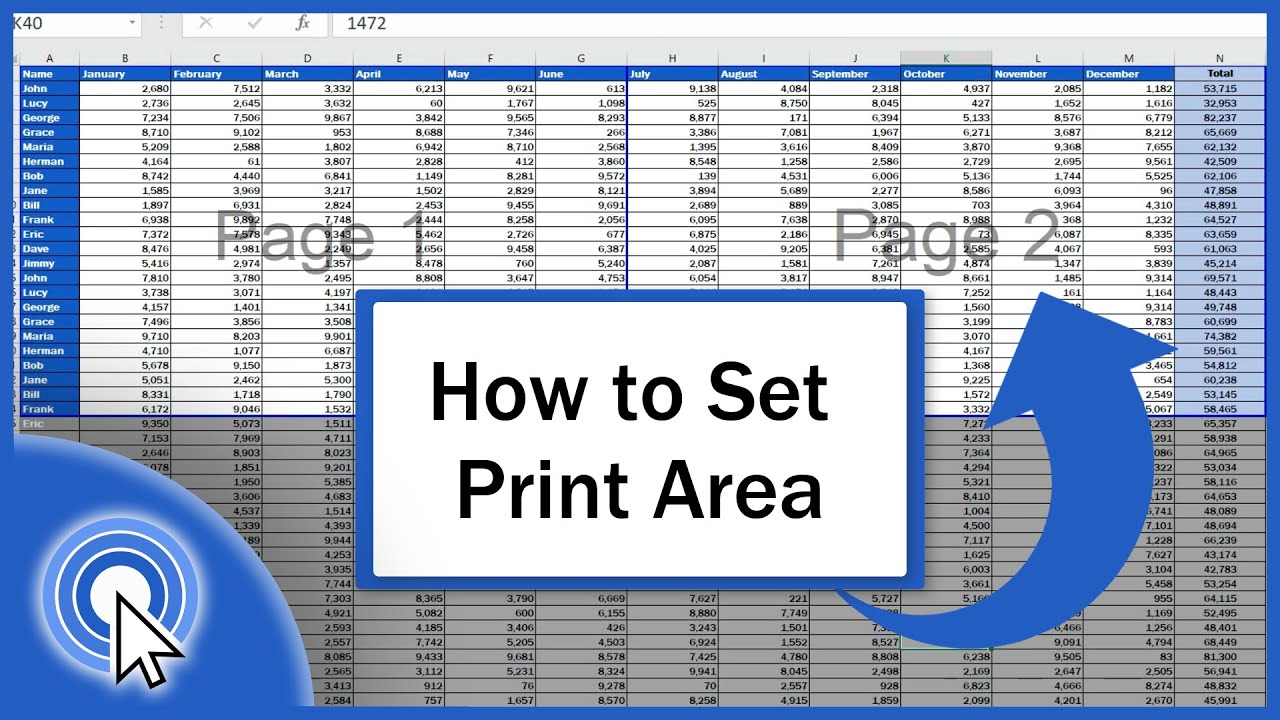
How to Set Print Area in Excel (5 Methods) ExcelDemy
:max_bytes(150000):strip_icc()/ExcelClearPrintArea-5c1c287ac9e77c000159666f.jpg)
How To Select Printable Area In Excel
Select Printable Area Excel
Select Printable Area Excel
:max_bytes(150000):strip_icc()/ExcelSetPrintArea-5c23d199c9e77c0001adc722.jpg)
Select Printable Area Excel
Select A Range Of Cells.
To Set The Print Area, You Select The Area And Hit The Set Print Area Command;
To Do This, You Need To.
To Set A Single Print Area In Excel, You Can Use The Set Print Area Command, Page Setup Dialog Box, Page Break Preview Feature, Print Selection Setting, And Excel Vba Code, As Described In.
Related Post: